10 Steps to Prepare a House for Exterior Painting
You're probably aware of that one house in the neighborhood that's always on point. Their home's landscaping is immaculate, and the painted trim looks like it was touched up daily by professionals. You wouldn't be shocked to find this house on the cover of a home magazine.
You're probably equally aware of the least desirable house in the neighborhood. It could be brimming with tumbleweeds or have enough peeling paint to be a picture-perfect background for the Addams family. Regardless, most of our homes fall somewhere in between the two.
What if you could perform an exterior painting project that cost less and looked better than the pros? It sounds hard to believe, but it's true!
Preparation is vital when it comes to painting. The insider secret when it comes to the best paint jobs is investing in quality pre-paint work long before you ever pick up a brush.
Want to know an insider secret for getting the best paint job? Preparation is vital when it comes to painting. You should invest in quality pre-paint work before laying a brush on your home. Here are ten easy steps to prepare your home for exterior painting.
Step 1: Proper Planning
Exterior paint prep can feel daunting to tackle. Depending on your experience level and the project's size, you might need help knowing where to begin. The best place to start is with a good plan.
Identify which part of the project you can break down into sections. Review areas that may cause trouble so you can approach them with the best resources.
If you have outdoor pets, consider how the project may affect them. While preparing your house for exterior painting, you'll move around the perimeter with supplies. Pets may chew on or eat strange material they come across, so keep an eye on your materials and watch where any debris falls.
Step 2: Setup and Cover
Exterior paint prep projects often involve multi-story work, so you'll need a ladder or scaffold to boost your reach and safely support you. Setting up a ladder or scaffold outside is trickier than an interior application because of irregular ground stability. Because of the high risk of ladder slips and falls, renting scaffolding is usually safer and easier.
In addition to pet awareness, exterior paint projects require you to keep plants in mind. Use a lightweight canvas tarp to protect flower beds, shrubbery, and water features, and remove it at the end of each day. Be careful where you place ladders and scaffolding, so you don't damage delicate plants or landscape features. Consider temporarily relocating potted plants or other items that could pose a tripping hazard.

Step 3: Remove Contaminants
The U.S. outlawed lead paint, but many homes built before 1979 still have this paint on their walls. If you suspect lead, don't attempt to wash, scrape, or sand it. You must test the paint before proceeding further. Contact a certified lead abatement contractor to perform your testing and remove paint if necessary.
While less common in the Phoenix area, you should still inspect your home's exterior for mold or mildew. Look for green, brown, or black stains or spots that have a fuzzy appearance. If you're unsure whether a stain is dirt or mold, apply bleach. If it bleaches away, the pigment is mold or mildew.
To remove mold and mildew, use a 3:1 solution of water to bleach. You can also use any EPA-registered micro biocide or fungicide if you prefer higher concentrated products. Look for cleaners that perform double duty by removing mold, mildew, grime, grease, and oil.
Step 4: Scraping and Sanding
The most challenging part of painting prep is sanding and scraping. It's annoyingly tedious but essential because it provides a mechanical bond between the paint and your home. Painting over flaking paint only results in more flaking. Skipping the sanding process leaves divot areas that can be large and unsightly.
If you're working on an unpainted surface, you can give it a quick sanding and move on. However, most previously painted surfaces require scraping and flush sanding.
Remove poorly adhered paint by hand using a stiff metal wire brush or scraper. You may opt for a power sander with a paint-stripping attachment to speed up your work. Wear a dust mask or respirator, gloves, and eye protection while working.
Scrape and sand with the wood grain, and be aware of bits of steel that may become lodged in softwood. Remove these pieces as you go, or they can damage your paint job.
Refresh the surfaces of weathered wood with medium-grit paper. Do another sanding pass with fine-grit paper if you intend to use glossy or semi-gloss paint on areas like door and window trim.

Step 5: Make Needed Repairs
As you remove loose paint by sanding and scraping, you'll likely notice areas damaged by normal wear and tear, weather, or animal/insect activity. Regardless of the cause, this is the perfect time to make repairs yourself or call in a carpenter.
Check for rot by probing darkened areas of the siding with a nail. Spots that are discolored but firm indicate weathering and only need additional sanding to look new again.
However, soft discolored areas indicate rot. Small or shallow areas can be dug out and repaired with a two-part exterior wood filler. If rot is deep or widespread, it's best to replace the entire piece of wood.
If damage is more extreme and impacts the wood framing, foundation, or roof—it's time to call in a structural expert. A contractor will be able to recommend how to proceed with damage repair.
Step 6: Wash the Home
After repairs comes cleaning. Sanding dust and debris will come off with a quick wipe down or air spray.
If your house still has some existing paint, you can speed up the removal process by power washing the entire house. Pressure washing is also an option for stained walls, although you may want to use gentler options depending on the condition of the wood.
If you opt for power washing, be careful not to spray upward. Instead, direct the sprayer so that the force of the washer moves in the same direction as rainfall. The siding cannot protect itself from water coming at it from below.
If your house has softwood siding, avoid power washing because it can damage the wood. Softwoods, such as redwood or cedar, must be hand-scrubbed with detergent and water—especially if they're older or weathered.
It's tempting to spray your home's exterior with a garden hose and say it's good enough. However, you'll regret this when your paint doesn’t stick properly or look texturally uneven. Remember, every moment you spend in your pre-paint work is time saved in the final paint job.

Step 7: Prime the Walls
Priming helps new paint stick to previously painted surfaces. Prioritize areas where you have stripped peeling paint. However, ideally, you should prime the entire house to create a cohesive paint job. Priming is especially crucial if you're using latex paint over a surface that already contains an oil-based paint.
Priming becomes even more critical if you're changing the house's color significantly. Choosing your primer depends on your paint choice. Choose a light-colored primer or one that supports your intended paint color. Use a latex or an oil-based primer recommended for exterior repainted surfaces. Once primed, don't leave any primed surface unpainted.
Step 8: Prepare for Spills
Before you bring out the paint, ensure you have something close at hand to clean up spills. If you're using latex paint, utilize water and clean rags. If you're using oil or enamel-based paint, you'll require mineral spirits or paint thinner.
Check the paint can label to see the manufacturer's recommendations for cleanup. Be warned that sometimes people use the terms 'mineral spirits' and 'paint thinners' interchangeably. However, mineral spirits have lower fumes for indoor use. Paint thinners are less expensive than mineral spirits but have high volatile organic compounds (VOC) levels.
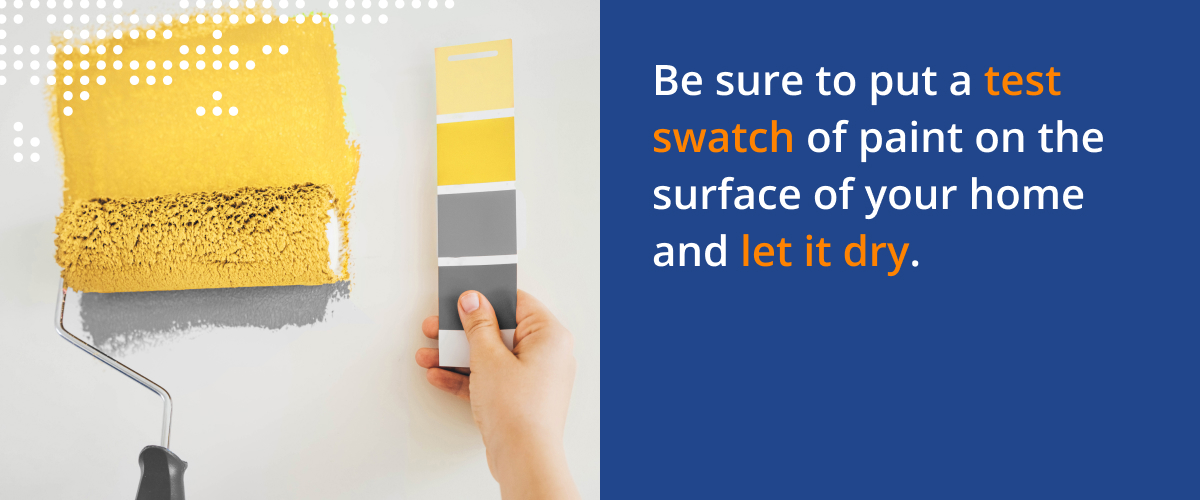
Step 9: Test Swatch
You've come all this way, and we know it can be tempting to get the painting over and done with. However, before you dive into full painting mode, be sure to put a test swatch of paint on the surface of your home and let it dry.
Once dried, check to ensure it matches the exterior color you picked out. There's nothing worse than getting halfway across a house before realizing you've painted the wrong shade or it's a flat instead of a semi-gloss.
Step 10: Plan Around the Weather
Always keep one eye on the weather when planning any home project. Rain isn't the only thing that can mess with an exterior paint job, so consider other climate aspects.
For example, caulk and paint have limited working temperatures. Too hot or too cold, and they will cure slowly or not at all. Read their labels to be sure you're using them as directed.
Humidity and heat are other factors that can slow down cure times. If you're painting in humid conditions, check the previous coat before adding another. For hot environments, consider the path of the sun. Sections that get little or no direct sun will set up slower. Areas in direct sunlight will feel dry to the touch before being fully cured.
It's Time to Paint!
With these ten steps, you're ready to begin painting. At this point, you've completed the most demanding work and will soon be able to relax and enjoy the finished product of a quality paint job that lasts many years. If you have uncovered some areas that need repair or inspection, call Legacy Repair! We're known for our roof inspections, coating, cleaning, and repair.